Travel Made Easy: Applying for Your Egypt e-Visa Online (2025)
Last Updated: December 14, 2024
Do not be misled by online rumours about the official website for the Egypt e-Visa. While some social media users claim the official visa website is ‘broken’ or ‘does not work’, these assertions are largely unfounded. The truth is, the Egyptian electronic Visa portal functions smoothly, with only minor, easily navigable glitches that we have addressed in our guide. By carefully following the instructions, you will find the process straightforward and efficient. Equally important, dismiss any claims about electronic Visas being rejected at Egyptian airports. This scenario is extremely unlikely when using the official website, as Egyptian authorities will not deny entry on a visa they have issued themselves. Be wary of dubious anecdotes suggesting visa rejections followed by on-the-spot approvals (by purchasing a visa which is then miraculously accepted) – these stories often lack credibility and may be attempts to misdirect travellers towards unnecessary and costly ‘assistance’ services. Remember, a legitimate electronic Visa from the official portal provides a high degree of assurance for your entry, helping to ensure a smooth start to your Egyptian adventure.
Introduction
Welcome to our comprehensive Egypt e-Visa Application Guide 2025. Planning your Egyptian adventure has never been easier with our step-by-step instructions, complete with screenshots and essential tips to ensure a successful online application.
You may also wish to visit the BBC’s website to gather some general information about Egypt.
Disclaimer
Please be advised that all personal details, including names, photos, passport numbers, and visa information depicted in the screenshots and document samples on this blog are entirely fictitious. They are used for illustrative purposes only and do not represent any real individuals or their applications.
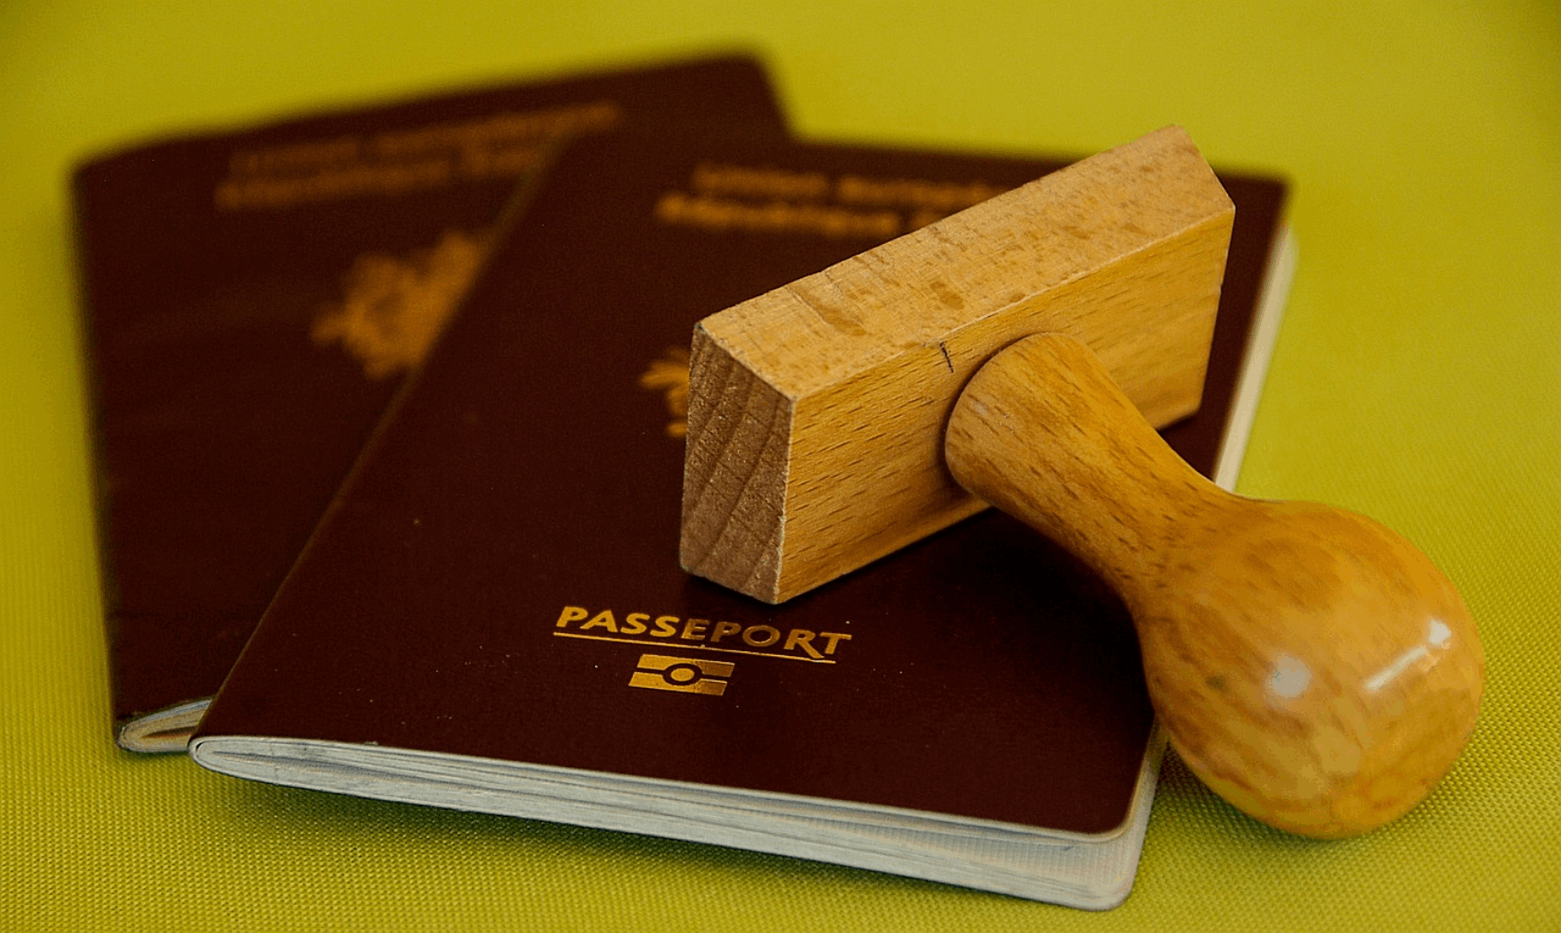
Egypt offers a variety of visa options tailored to different nationalities and travel purposes. Selecting the correct visa is vital for a hassle-free journey. Here is a breakdown of the available options:
1. Embassy/Consulate Issued Visas (Traditional Sticker Visas)
Physical Visas: These visas are physical stickers affixed to your passport. To obtain one, you must personally visit the nearest Egyptian embassy or consulate in your country of residence, or appoint a representative to do so on your behalf.
Application Process: During your (or your representative’s) visit, you will need to submit a fully completed application form, supporting documents (which vary depending on the visa type and your nationality), and your passport. The embassy or consulate will retain your passport for processing. It is advisable to check with your local embassy or consulate for specific document requirements before your visit.
Postal Applications: Some embassies and consulates offer a postal application service, allowing you to apply remotely. This option can be more convenient for those who live far from an embassy or consulate. Again, confirm the availability of this option and the specific procedures with your local embassy or consulate.
2. Visa on Arrival (VOA) at the airport
Obtain Upon Arrival: This option provides travellers with the convenience of obtaining a visa upon arrival in Egypt. It offers flexibility for those who prefer to arrange their visa closer to their travel date.
Considerations:
Potential Queues: Be prepared for potential queues at designated airport booths to purchase the visa sticker.
Immigration Process: After obtaining the sticker, you will proceed through immigration as usual.
3. E-Visas (Single or Multiple Entry)
Streamlined & Digital: E-Visas offer a streamlined, fully digital application process, making them the most convenient option for eligible travellers. For single entry e-Visas, you will have 90 days to enter Egypt from the issuing date. Once in Egypt, you can stay up to 30 days. For multiple entry e-Visas, you will be granted 180 days to enter Egypt multiple times, as long as no single stay exceeds 30 days.
For example, if your single entry e-Visa is issued on 01 January 2025, you can enter Egypt up and until 31 March 2025 (90 days after the issuing date). But once you are in Egypt, say you travel on 15 January 2025, you can stay for 30 days up and until 14 February 2025.
Benefits:
Online Application: You can apply online from the comfort of your home or office.
Electronic Delivery: Receive your visa electronically via email.
Print & Present: Print a copy of your e-Visa and present it alongside your passport upon arrival at Egyptian immigration. This eliminates the need for embassy visits or queuing at the airport for a visa.
Discover Egypt’s Weather
Dive Into Our Expert Weather Guide for Perfect Travel Planning
While Egypt welcomes travellers from around the world, specific nationalities benefit from special visa arrangements.
UK, EU and USA Nationals: Travellers from these countries enjoy a visa-free stay of up to 15 days when visiting the South Sinai Governorate resorts of Sharm El Sheikh, Dahab, Nuweiba and Taba exclusively. This means you can enter these specific resort areas without obtaining a visa beforehand. However, if your travel plans include exploring other parts of Egypt such as Cairo, Luxor, or Aswan, obtaining a visa in advance is mandatory. British Citizens may wish to check the latest FCO advice here.
Malaysian Nationals: Malaysian citizens can enjoy a visa-free stay of up to two weeks in Egypt. This allows for a reasonable amount of time to explore the country’s highlights without the need for a visa. However, if your stay exceeds two weeks, you will need to obtain a visa, either through the embassy/consulate, on arrival, or via the e-Visa system if you are eligible.
This guide focuses on the process of obtaining an electronic Visa (30-day Tourist Visa), the most convenient option for eligible travellers.
The Importance of Using the Official Website
When applying for your e-Visa, it is crucial to use only the official Egyptian e-Visa portal: https://www.visa2egypt.gov.eg/. Numerous websites may claim to offer Egyptian e-Visa services, but these could be agents charging inflated processing fees or, worse, scams designed to exploit unsuspecting applicants. Always double-check the website address in your browser’s address bar to ensure you are on the official Egyptian e-Visa portal.
Determining Eligibility for an e-Visa
The following countries are eligible for the e-Visa:
Albania
Australia
Austria
Belgium
Bulgaria
Croatia
Cyprus
Czechia
Denmark
Estonia
Finland
France
Germany
Greece
Holy See
Hungary
Iceland
Ireland
Italy
Japan
Korea, Republic of
Latvia
Lithuania
Luxembourg
Macedonia, Republic of
Malta
Moldova, Republic of
Monaco
Montenegro
Netherlands
New Zealand
Norway
Poland
Portugal
Romania
Russian Federation
Serbia
Slovakia
Slovenia
Spain
Sweden
Switzerland
Ukraine
United Kingdom
United States of America
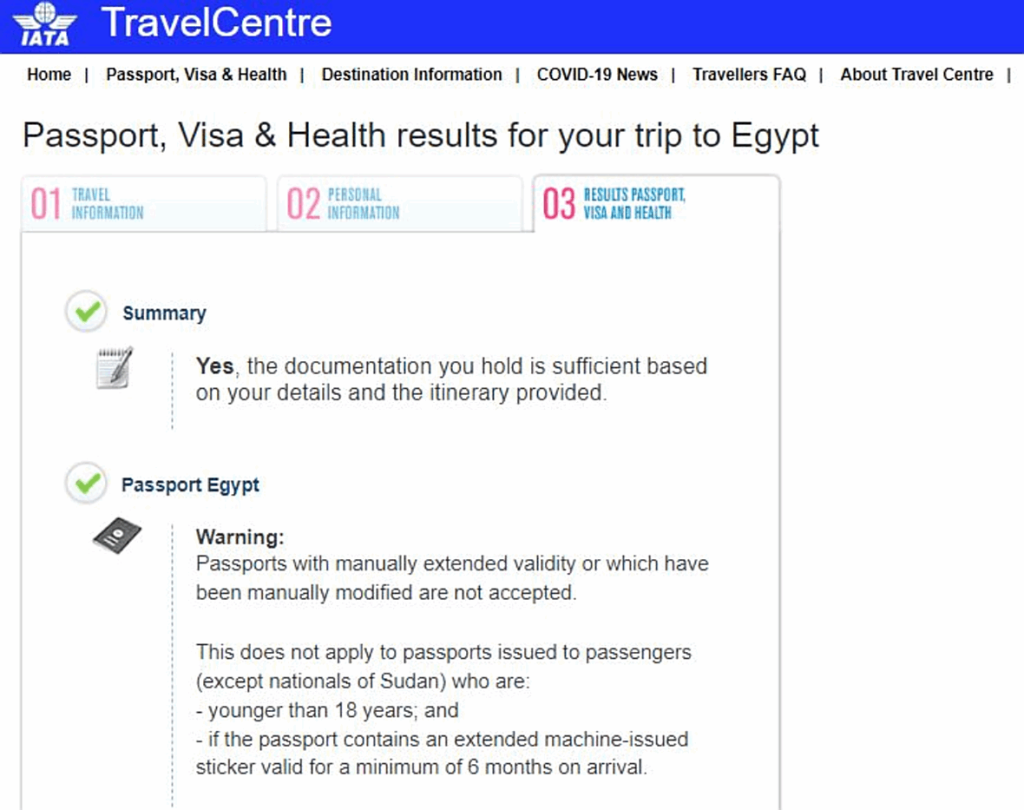
Seeking Further Guidance: The IATA Travel Centre
IATA | Travel Advice | Results (*Disclaimer)
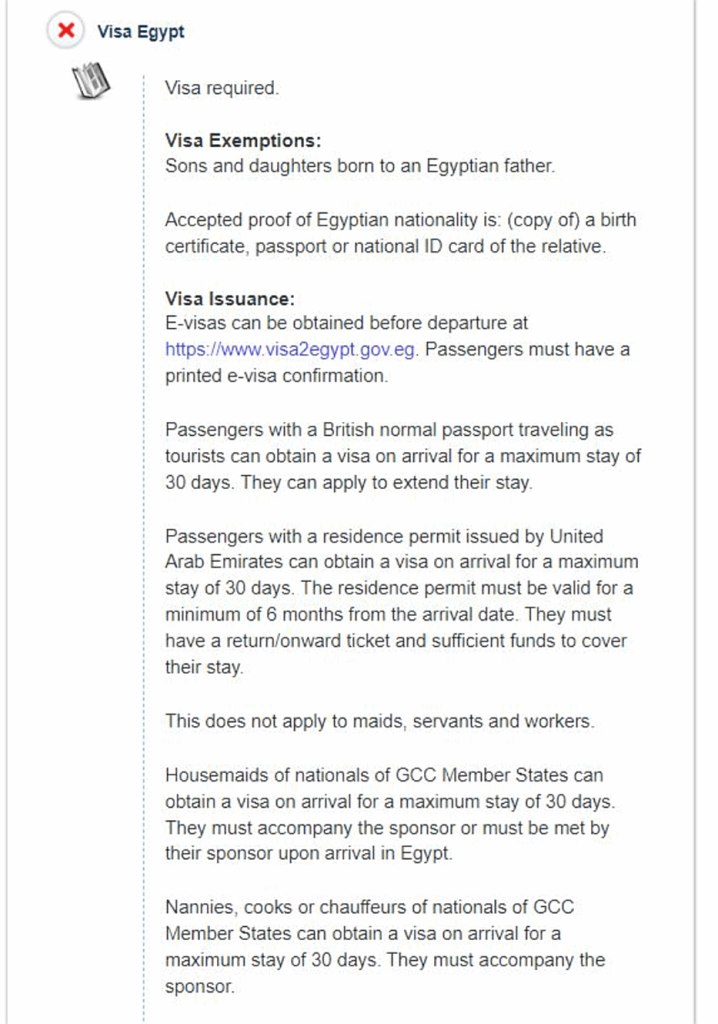
IATA | Travel Advice | Results (*Disclaimer)
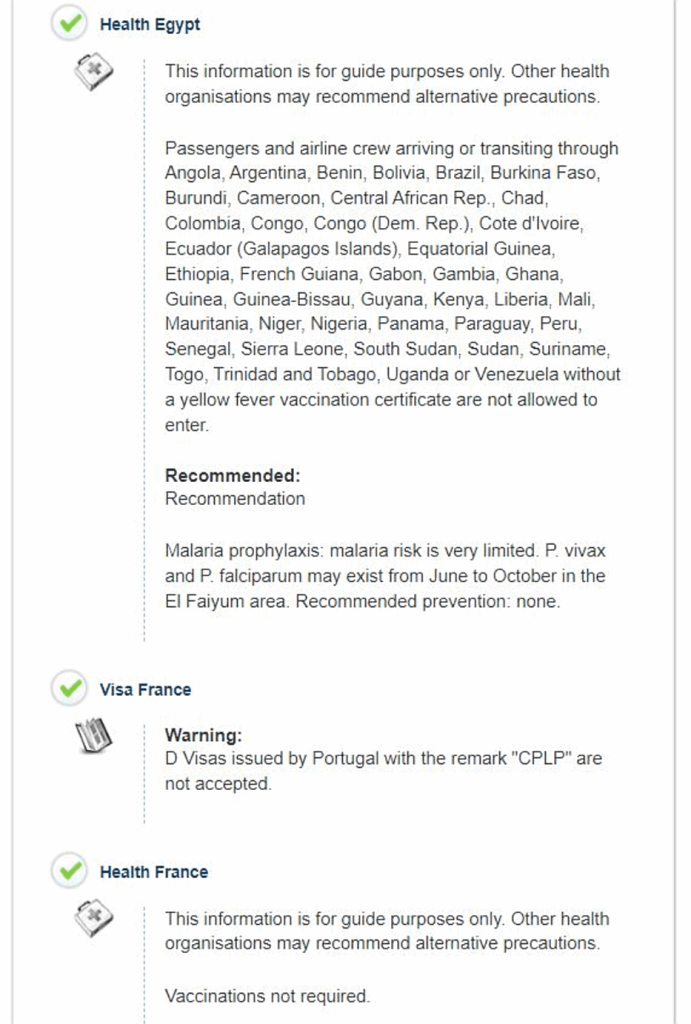
IATA | Travel Advice | Results (*Disclaimer)
IATA | Travel Advice | Results (*Disclaimer)
IATA | Travel Advice | Results (*Disclaimer)
IATA | Travel Advice | Results (*Disclaimer)
If you have any doubts about your eligibility or require personalised passport, visa, or health advice tailored to your specific circumstances and travel itinerary, the IATA Travel Centre is a valuable resource. Used by airlines worldwide, this tool offers up-to-date and comprehensive travel guidance.
Unlock Egypt’s Secrets: Your Essential Money Guide
Navigate Cash, Cards, and Avoid Scams With Ease. Read Our Complete Egypt Money Guide Now and Ensure a Worry-Free Adventure!
Please be advised that all personal details, including names, photos, passport numbers, and visa information depicted in the screenshots and document samples on this blog are entirely fictitious. They are used for illustrative purposes only and do not represent any real individuals or their applications.
Tip
Using the Firefox browser is recommended for a smoother and more reliable user experience. Google Chrome has been known to encounter occasional glitches on the platform.
Step 2: Registering Your Account
e-Visa Application | Egypt | STEP 2 (*Disclaimer)
e-Visa Application | Egypt | STEP 2 (*Disclaimer)
e-Visa Application | Egypt | STEP 2 (*Disclaimer)
e-Visa Application | Egypt | STEP 2 (*Disclaimer)
If you are a first-time user, you will need to register an account on the official website. This is a one-time process and you can use the same account for all future e-Visa applications. Follow these steps to register:
Click on “Sign Up”: Locate the “Sign Up” button, usually prominently displayed on the website’s homepage and click on it.
Provide Your Information: Enter the following personal details, ensuring they match your travel documents precisely:
First Name: Enter your first name as it appears on your passport.
Surname: Enter your last name as it appears on your passport.
Email Address: Provide a valid and regularly checked email address, as this will be the primary mode of communication from the e-Visa portal.
Password: Create a strong password that meets the specified criteria:
At least one lowercase letter.
At least one uppercase letter.
At least one number.
At least one special character.
A minimum of 8 characters.
No consecutive identical characters.
An example would be “Aukalan81#” (please choose your own secure password).
Complete the reCAPTCHA: Solve the reCAPTCHA challenge, a standard security measure to verify that you are a human user and not an automated bot. This usually involves identifying images or typing in distorted text.
Submit Your Registration: Click on the “Sign Up” button to submit your registration details.
Confirm Your Email Address: Check your email inbox for a message from the e-Visa portal containing a confirmation link. Click on the link to verify your email address and activate your account.
Account Activation: Once your email is successfully verified, you will see a confirmation screen indicating that your account is active and ready for use.
Step 3: Creating Your e-Visa Application
e-Visa Application | Egypt | STEP 3 (*Disclaimer)
Now that your account is active, you can proceed to create your e-Visa application:
Log In: Access your account by clicking on “Sign In” and entering your registered email address and password.
Start a New Application: Click on the “CREATE NEW APPLICATION” button to initiate a new e-Visa application.
Step 4: Providing Travel Information
e-Visa Application | Egypt | STEP 4 (*Disclaimer)
In this step, you will provide details about your planned trip to Egypt:
Application Type:
Choose the appropriate application type based on your travel companions:
Individual: If you are applying for yourself only.
Family: If you are applying for yourself and family members travelling together on the same itinerary. You will provide their details later in the application.
Group: If you are applying for unrelated individuals travelling together on the same itinerary. You will provide their details later in the application.
Visa Type:
Select “Tourism” as your visa type. This is the standard visa type for leisure travel to Egypt.
Entry Type:
Choose either “Single” for a one-time entry or “Multiple” for multiple entries within the visa’s validity period. A single-entry visa allows you to enter Egypt once, while a multiple-entry visa allows you to enter and exit the country multiple times within the visa’s validity period.
Travelling From:
Select your country of departure from the list provided. This refers to your initial departure point, not any transit countries where you may have connecting flights.
For example, if you are travelling to Cairo from London Heathrow with Air France, changing planes in Paris, your departure country will be “United Kingdom (England, Northern Ireland, Scotland and Wales)”.
Expected Arrival Date:
Choose your anticipated arrival date in Egypt. This should be the date you plan to land in Egypt.
For “Single” entry visas, this date must fall within 90 days from the date you submitted your e-Visa application. This means you must arrive in Egypt within 90 days of your e-Visa issuing date.
Do not worry if your travel plan changes, you will be fine as long as visit Egypt within 90 days of your e-Visa issuing date.
Expected Departure Date:
Select your planned departure date from Egypt. This should be the date you plan to leave Egypt.
For “Single” entry visas, this date must be within 30 days of your “Expected arrival date”, as single-entry e-Visas are only valid for a maximum of 30 days once you enter Egypt.
Do not worry if your plan changes later, you will be fine as long as you leave Egypt within 30 days of arrival.
Proceed to the Next Step: Click on the “NEXT” button to move on to the next section of the application.
Tip
You can now navigate the website by pressing the “PREVIOUS” and “NEXT” buttons if needed. This allows you to review your entries and make any necessary changes before proceeding.
Step 5: Providing Applicant Information
e-Visa Application | Egypt | STEP 5 (*Disclaimer)
e-Visa Application | Egypt | STEP 5 (*Disclaimer)
e-Visa Application | Egypt | STEP 5 (*Disclaimer)
e-Visa Application | Egypt | STEP 5 (*Disclaimer)
e-Visa Application | Egypt | STEP 5 (*Disclaimer)
e-Visa Application | Egypt | STEP 5 (*Disclaimer)
This section of the application requires you to provide personal and passport information. Ensure all details are accurate and match your travel documents exactly to avoid any complications during processing.
Applicant Details
First Name(s):
Enter your full first name and any middle names within the “First Name (s)” box. This should match your passport details exactly.
Surname:
Write your surname as it appears on your passport.
If your surname is hyphenated, it is recommended to write it as two separate words (e.g., “Robinson Smith” instead of “Robinson-Smith”). Using any special characters such as a hyphen (-) will cause an error and it will not allow you to proceed. You may want to check with your local embassy or consulate for clarification, but minor discrepancies like this are unlikely to cause issues.
Full Arabic Name:
Leave this field blank unless you have an Arabic name that you wish to provide.
Personal Information:
Select your gender from the options provided.
Enter your date of birth in the format specified on the form.
Select your country of birth from the dropdown menu.
Select your current nationality from the dropdown menu.
Select your original nationality (if different from your current nationality). “Original Nationality” means that if you were born in a different country and subsequently acquired a different nationality, then you need to mention your first nationality, even if you are travelling on your second nationality’s passport. In our experience, this was not an issue if you have dual nationality.
Additional Nationalities:
Choose “Yes” or “No” to indicate if you have any other nationalities besides the ones mentioned above. If you select “Yes”, you will be prompted to provide details of your additional nationalities.
Profession:
Write down your profession, such as “ACCOUNTANT.”
Note that only ONE each of the following special characters is allowed for this field: hyphen (-), dot (.), apostrophe (‘), and comma (,).
Tip
We suggest keeping it simple and avoiding special characters altogether in your profession field to minimise the risk of errors.
Marital Status:
Choose your current marital status from the options provided.
Passport Information
Passport Type:
Select “Ordinary Passport”. This is the standard passport type for most travellers.
Passport Details:
Enter your passport number accurately, as it appears on your passport.
Select the place of issue from the dropdown menu.
Select the issue date of your passport using the calendar provided.
Select the expiry date of your passport using the calendar provided.
Previous Visits to Egypt:
If you have visited Egypt before, click on “Yes” for the question “Have you visited Egypt before?”. If not, select “No” and move on to the next question.
Last Visit Details (if applicable):
If you answered “Yes” to the previous question, write down the arrival and departure months and years of your last visit in the “Date from (last visit)” and “Date to (last visit)” fields.
Tip
Only the MONTH and YEAR are required here. You do not need to provide the exact dates.
Where did you stay during this period? (if applicable):
In the “Where did you stay during this period?” field, write down the name and address of the hotel where you stayed during your last visit to Egypt.
Tip
DO NOT use any special characters (commas, hyphens, full stops) and DO NOT leave any extra spaces at the start or end, as this will result in an error message. DO NOT write any numbers such as the postcode as, despite the website claiming otherwise, it will return an error message. Write everything on one SINGLE line.
Example: Staybridge Suites Cairo Citystars Emtedad Obied Street Cairo
Deportation History:
Next, choose whether you have been deported from Egypt or any other country before. Be honest in your answer. If you choose “No”, leave the “Reason” field blank.
Contact Details
Communication Channels:
Write down your email address, phone number and home address.
Telephone Number:
You can use the “+” sign for your telephone number, e.g., +44758478574.
Home Address:
For your home address, special characters are NOT allowed. Write your address clearly, using one line for each element:
Street address
City/Town
Postal Code
Country Example: 123 Clarin Court London EC1 2XX United Kingdom
Address Formatting:
As a precaution, DO NOT leave any extra spaces at the start or end of each line of your address.
Supporting Documents
This is the final section for Step 5.
Passport Copy:
Upload a clear copy of your passport’s photo/details page. This is the page with your photograph and personal information.
The copy should be in JPG or PNG format only. These are standard image file formats.
The file size should not exceed 1 MB. This is a standard file size limit for online applications. You can use free online tools to compress your file size if needed.
Tip
When naming your JPG or PNG file, DO NOT USE SPACES OR SPECIAL CHARACTERS. This is important to avoid errors during the upload process.For example:
Incorrect: Alan Smith.JPG (space present)
Incorrect: Alan_Smith.PNG (special character present)
Correct: AlanSMITH.PNG (no spaces or special characters)
To upload your passport copy:
Select “Passport” from the “Document Type” dropdown menu.
Click on the “ATTACH” button. This will open a pop-up screen.
Click on “BROWSE” to navigate to and select your passport file on your computer.
Select the file and click “Open.”
Your file will then appear on the pop-up screen. Click on “Attach” to complete the upload.
Tip
If you encounter an error message at this stage, double-check the file name, format, and size of your passport copy to ensure they meet the specified requirements.
You will then see your passport listed under “Document Name”. If needed, you have the option to “VIEW” or “REMOVE” the uploaded document.
To complete Step 5, click on “SAVE/UPDATE APPLICANT.” This will save all the information you have entered in this section.
Click on “NEXT” to proceed to the next section. If you receive a message asking if you want to save applicant data before moving to the “Host Information” tab, click on “YES.”
Step 6: Host Information
e-Visa Application | Egypt | STEP 6 (*Disclaimer)
This section gathers information about your intended accommodation in Egypt.
Host Type:
Select “Tourism Company” if you will be staying at a hotel. This is the most common host type for tourists.
Host Name:
Write the complete name of the hotel where you will be staying.
Host Contact Details:
Provide the hotel’s phone number and email address. This information allows the Egyptian authorities to contact your hotel if needed.
Host Fax Number:
Leave “Host fax number” blank, as it is not compulsory. Fax machines are rarely used nowadays.
Host Address:
For “Host address”, write everything on ONE line, with spaces between words, no numbers such as postcodes, and no special characters at all.
Example: Holiday Inn Cairo Citystars Emtedad Obied Street Cairo
Travel and Accommodation Expenses:
Choose the option that reflects who will be covering the costs of your trip and accommodation. Usually, this will be “By the applicant himself/herself,” unless someone else is sponsoring your trip.
Save Host Information: Click on “SAVE” to store your host information.
Step 7: Confirm Your Application
e-Visa Application | Egypt | STEP 7 (*Disclaimer)
e-Visa Application | Egypt | STEP 7 (*Disclaimer)
e-Visa Application | Egypt | STEP 7 (*Disclaimer)
e-Visa Application | Egypt | STEP 7 (*Disclaimer)
You are now almost finished with your e-Visa application. Before making the payment, take a moment to review your application to ensure everything is correct.
Download Draft (Optional):
If you want to download a draft copy of your application for your records, click on “DOWNLOAD DRAFT APPLICATION.” This will download a copy of your application in its current state to your device.
Review and Edit:
Carefully check all the information you have provided, especially your personal details, passport details, travel dates, and host information.
Click on “EDIT” if you need to make any changes to any section of the application.
Application Reference Number:
You will see your unique application reference number at this point. Make a note of this number for future reference. You may need it if you have any queries about your application.
Application Status:
Your application status will show as “DRAFT”. This means that it has not yet been submitted for processing.
Final Confirmation:
Once you are happy with all the information and are ready to submit your application, click on the green “CONFIRM” button.
Terms and Conditions:
A pop-up window will appear, displaying the e-Visa service’s “Terms and Conditions” and “Refund/Cancellation Policy.” Take a moment to scroll down and carefully review these documents. They contain important information regarding the service, including processing times, fees, and procedures for refunds or cancellations. Once you have read and understood the terms, tick the “I agree” box and click on “YES.”
Confirmation:
After agreeing to the terms and conditions, your application status will change to “CONFIRMED.” This indicates that your application has been successfully submitted and is now awaiting processing by the Egyptian authorities.
Step 8: Make Your Payment
e-Visa Application | Egypt | STEP 8 (*Disclaimer)
e-Visa Application | Egypt | STEP 8 (*Disclaimer)
e-Visa Application | Egypt | STEP 8 (*Disclaimer)
e-Visa Application | Egypt | STEP 8 (*Disclaimer)
Now that your application is confirmed, you will need to proceed with the payment for your e-Visa. The fees vary depending on the type of visa you have selected.
e-Visa Fee:
The current e-Visa fees are as follows:
Single Entry Visa: US$25
Multiple Entry Visa: US$60
Payment:
Click on the “PAY” button to begin the payment process.
A “Warning” pop-up window may appear, reminding you to double-check your details before proceeding. Select “OK” to continue.
Payment Method:
The e-Visa portal currently accepts payments via Mastercard and Visa. Click on the logo of your preferred payment method.
Payment Page:
You will be redirected to a secure payment gateway page where you will need to enter your card details. Ensure all the information is accurate to avoid any payment errors. The total amount payable, based on your chosen visa type (single or multiple entry), will appear automatically. Double-check this amount before proceeding.
Receipt:
Once the payment is successfully processed, you will see a receipt on your screen. It is highly recommended to download and save this receipt for your records as proof of payment.
Email Confirmation:
You should also receive an email confirmation for your payment. This email will contain details of your transaction and can be used as additional proof of payment. Keep this email for your records.
Application Status:
After successful payment, the status of your application will change to “NEW.” It will then change to “IN PROCESS” as your application is reviewed by the Egyptian authorities. Once approved, the status will change to “APPROVED.”
Step 9: Receive Your Visa by Email and Following up
e-Visa Application | Egypt | STEP 9 (*Disclaimer)
e-Visa Application | Egypt | STEP 9 (*Disclaimer)
Your e-Visa will be delivered electronically to the email address you provided during the registration process.
Processing Time: It takes around 7 working days for e-Visas to be processed and issued. In our experience however, it is usually 2-3 working days. Please note that processing times can vary, so it is advisable to apply well in advance of your planned travel dates.
Following up: In our experience, if there is anything you want to let the authorities know such as the need to expediting the visa approval process, sending them a message via their ‘Contact Us’ page, quoting all relevant details – including your application reference number, usually helps. They will probably not reply directly but they will look at expediting the process (check your application status regularly).
The weekend in Egypt is Friday and Saturday, which are considered non-working days. Keep this in mind when calculating the processing time for your application.
Step 10: Print Your Visa
Once you receive your e-Visa in your email inbox, print a clear copy of the document (check your junk folder too!). It is essential to carry this printed copy with you during your travels in Egypt.
Arrival in Egypt: Upon arrival at your designated Egyptian airport, proceed directly to the immigration counters. Present your printed e-Visa alongside your passport and your completed landing card to the immigration officer. Note that your landing card is not your visa but it is something everyone has to fill out (one will be usually be given out on-board by your airline). There is no need to queue up to buy your visa at the airport or engage with any individuals posing as “agents” offering assistance with visa services. These individuals may be attempting to scam you.
Egypt | Landing Card
Conclusion: Embarking on Your Egyptian Adventure
With your e-Visa secured, you are now ready to experience the wonders of Egypt.
Enjoy the country’s rich history, vibrant culture, and warm hospitality!
Skip the visa queues and enjoy a hassle-free arrival in Egypt. Apply for your e-Visa online in minutes!
Safe travels!
Disclaimer
Please be advised that all personal details, including names, photos, passport numbers, and visa information depicted in the screenshots and document samples on this blog are entirely fictitious. They are used for illustrative purposes only and do not represent any real individuals or their applications.
Frequently Asked Questions About Egypt Visas
Planning your journey to Egypt and need clarity on the visa process? We have compiled an extensive list of frequently asked questions to provide you with detailed and up-to-date information. Our aim is to ensure you have a smooth and hassle-free experience as you embark on your Egyptian adventure.
Yes, most nationalities require a visa to enter Egypt. It is important to verify your specific visa requirements before travelling.
You can check with your local Egyptian Embassy or Consulate for the most accurate and current information. Alternatively, you can use the IATA Travel Centre, a free online tool widely used by airlines to check visa and health regulations based on your nationality and travel itinerary.
Exception: If you are flying directly to Sharm El Sheikh Airport and plan to stay for less than 15 days in the resorts of Sharm El Sheikh, Dahab, Nuweiba, or Taba, you do not need a visa. Upon arrival, you will receive a free entry permission stamp. However, if you intend to stay longer than 15 days or travel outside these resorts, you must obtain a visa. You can apply for an e-Visa online or get a visa upon arrival at Sharm El Sheikh Airport.
The validity of your Egyptian visa depends on the type you obtain.
For an e-isa or visa on arrival, a single-entry visa is valid for entry within 90 days from the date of issue, allowing a stay of up to 30 days in Egypt.
A multiple-entry e-Visa is valid for entry within 180 days from the date of issue, permitting multiple entries into Egypt during this period, with each stay not exceeding 30 days.
If you obtain a multiple-entry visa from an Egyptian Consulate (for example, in the UK), it may be valid for stays of up to 90 days per visit.
Please note that visa regulations can change at short notice, so it is always advisable to check with your local Egyptian Embassy or Consulate for the most up-to-date information before your trip.
Yes, we highly recommend to obtain an e-Visa for Egypt before travelling. There are several advantages to doing so.
Firstly, it can save you significant time upon arrival, as travellers have reported queuing for 45 minutes or more at visa kiosks in Egyptian airports due to limited counters and multiple flights arriving simultaneously.
Additionally, the UK authorities advise that “getting an e-Visa in advance can help to prevent delays“.
By applying for an e-Visa online, you can complete the process from the comfort of your home, avoiding the hassle upon arrival. Furthermore, you can pay securely online using a debit or credit card, eliminating the need for cash transactions at the airport.
Claims that obtaining a Visa on Arrival in Egypt takes only ‘seconds’ or ‘minutes’ are misleading.
In reality, the process can be time-consuming due to several factors. A standard aircraft can carry around 200 passengers, many of whom may require visas on arrival. With limited visa counters at airports and the possibility of multiple flights arriving simultaneously, queues can become significantly long, leading to potential delays.
Therefore, it is unrealistic to expect to obtain a visa in mere seconds or minutes under these circumstances. Obtaining an e-Visa in advance ensures a quicker and smoother arrival process.
You should always use the official Egyptian e-Visa portal to apply for your e-Visa. The official website is https://visa2egypt.gov.eg/. It is important to avoid third-party websites or agencies that may charge additional fees or potentially compromise your personal information.
Ensure you are on the official site by double-checking the URL and looking for security indicators such as a padlock icon indicating a secure connection.
While some users may find the official e-Visa portal less intuitive than other websites, it is functional and effective. If you can navigate social media platforms and complete online forms, you should be able to complete the e-Visa application without significant issues. To ensure a smooth application process, take your time to carefully read the instructions in each section, and make sure all details match your passport exactly. You may also refer to our detailed Egypt E-Visa Application Guide for step-by-step assistance.
No, both e-Visas and visas on arrival for Egypt cost US$25 for a single-entry visa. However, obtaining an e-Visa offers several advantages.
Firstly, it helps you avoid overcharging; at airports, individuals posing as officials may attempt to sell visas for US$30 or charge £25 instead of US$25, leading to unnecessary extra costs.
Secondly, an e-Visa provides payment convenience, allowing you to pay securely online by card. In contrast, at the airport, only cash payments are accepted, often with unfavourable exchange rates and change given in Egyptian Pounds.
Additionally, e-Visas offer a multiple-entry option valid for 180 days, permitting you to make several trips to Egypt during this period, with each stay up to 30 days.
Yes, every traveller, regardless of age, requires a visa to enter Egypt, including infants and children.
Parents can apply for their children’s e-Visas using their own account on the e-Visa portal; there is no need to create separate accounts for each child. During the application process, select the “Family” option and add each child’s details. This makes it easier to manage all family members’ visas in one place.Yes, every traveller, regardless of age, requires a visa to enter Egypt, including infants and children.
No, it is generally not true that Egypt e-Visas take two weeks to process. Our own experience shows that e-Visas can be approved in as fast as 24 hours if all information is correctly provided. The standard processing time is up to 7 working days.
To be safe, it is recommended to apply at least one week before your departure date to account for any unforeseen delays. Be cautious of misinformation; some sources may falsely claim longer processing times to discourage the use of e-Visas.
Your passport must be valid for at least six months from your date of arrival in Egypt.
When completing your e-Visa application, you should enter your name as it appears in the Machine-Readable Zone (MRZ) of your passport, which is the two lines of text at the bottom of the identity page. The MRZ does not include special characters such as hyphens or apostrophes, so you should omit these symbols.
If your name includes abbreviations (e.g., Ep., Vve., GEB., E/V, P/V), only include the names before the abbreviation. For names with non-Latin letters, you should convert them to their Latin equivalents as shown in the MRZ. It is crucial to ensure all information matches your passport exactly to avoid delays or issues with your application.
If you are experiencing difficulties uploading your scanned passport copy during the e-Visa application, please follow these guidelines.
Ensure your file name is simple and does not contain spaces or special characters – for example, use JohnSmithPassport.jpg.
The file must be in JPG (recommended) or PNG format; PDFs are not accepted.
Additionally, the file size must be less than 1 MB. If your scan is in PDF format, you can convert it to JPG using online tools like smallpdf.com/pdf-to-jpg. To reduce the file size without compromising quality, you can use imagecompressor.com.
Make sure the scanned image is clear and legible to avoid any delays in processing your application.
Yes, you can submit a copy of your National Identity Card instead of your passport if you are a national of Germany, Belgium, France, Italy, or Portugal. In this case, you must submit copies of both sides of your National Identity Card during the application process.
If you believe you have made a mistake in your personal information on the e-Visa application, do not worry. The Egyptian authorities often contact applicants via email if there are issues with the application. You should monitor your email inbox, including spam or junk folders, regularly after submitting your application.
If they reach out to you, respond promptly and provide any requested information or corrections to facilitate processing. This proactive approach can help prevent your application from being rejected due to errors.
No, you cannot pay for the Egypt visa on arrival with a credit or debit card. Visa on arrival fees must be paid in cash. The accepted currencies are US Dollars (preferred), Euros, and UK Sterling.
However, please be aware that the exchange rates may not be favourable when paying with currencies other than US Dollars, and any change is typically given in Egyptian Pounds. It is advisable to bring exact change in US Dollars to avoid any issues.
No, you cannot obtain the Egypt visa onboard the plane, and the landing card provided during the flight is not a visa or visa application form.
The card given out on planes is a landing card, which is required for immigration purposes and must be completed by all passengers. You must obtain a visa before travelling (e-Visa) or upon arrival at the airport.
No, if you have an e-Visa, you can proceed directly to the immigration counters upon arrival in Egypt. Make sure to have a printed copy of your e-Visa, your passport (valid for at least six months from your arrival date), and your completed landing card (usually provided during the flight or available in the arrivals area).
By heading straight to immigration, you save time by skipping the visa purchase queues and avoid potential interactions with unofficial agents.
If you are flying to Hurghada with a transit in Cairo, your visa will be checked during your transit in Cairo.
If you have an e-Visa, you should present a printed copy at the transfer counter in Cairo Airport.
If you do not have an e-Visa, you will need to purchase a visa on arrival at the visa counter in Cairo before proceeding to the transfer desk.
Please note that the transfer desk can be slow, often with limited staff, which increases the risk of missing your connecting flight. Obtaining an e-Visa in advance helps minimize this risk and ensures a smoother transit experience.
No, there are no legitimate cases of e-Visas being refused by Egyptian immigration officers when obtained through the official portal.
Some posts on social media may claim otherwise, but this misinformation is often spread by individuals aiming to discourage the use of e-Visas, possibly to direct travellers towards purchasing visas upon arrival where they or associated agents can overcharge.
E-Visas obtained from https://visa2egypt.gov.eg/ are recognised and accepted by Egyptian authorities. To ensure a smooth entry process, make sure you have a printed copy of your e-Visa to present upon arrival.
The e-Visa application process for Egypt is generally straightforward and user-friendly.
Some social media posts may claim that the process is complicated or does not work, but such statements are often misleading. These claims may be spread by individuals who benefit from travellers opting for visas on arrival. While minor glitches can occur, they are typically easy to resolve.
To ensure a smooth application, refer to the above comprehensive Egypt E-Visa Application Guide for detailed instructions and troubleshooting tips. It is also advisable to begin your application at least a week before departure to allow time for processing.
If your arrival date has changed after receiving your e-Visa, you generally do not need to do anything, provided that your new entry date falls within the validity period of the e-Visa.
For a single-entry e-Visa, you have 90 days from the date of issue to enter Egypt.
For a multiple-entry e-Visa, you have 180 days. As long as you enter Egypt within the validity period indicated on your e-Visa, it remains valid.
No, you cannot ‘lose’ your e-Visa as they it is sent directly to your email address, and they are linked electronically to your passport number.
Some misinformation may suggest that e-Visas can be lost or not recognised, but these claims are unfounded and may be spread to discourage the use of e-Visas.
For additional assurance, you can log into your account on the official e-Visa portal to view and reprint or download your visa at any time. We recommend to always keep a printed copy and a digital backup of your e-Visa when you travel.
Why trust our advice?
At TrippVibes, we fully grasp the importance of accurate information and strive to ensure travel is hassle-free. We have experienced firsthand the frustrations of misleading reviews and avoidable travel difficulties. This is why we are dedicated to providing you with the most up-to-date and reliable travel advice, as demonstrated in this comprehensive guide to securing your Egyptian e-Visa. Allow us to help you navigate the path towards unforgettable experiences.
Follow us on Facebook, Instagram and YouTube for more insider tips, inspiring itineraries and practical advice to make your next adventure your very best!
Have insights or tips from your own travel?
Share them in the comments below to help fellow travellers.
Embark on your Egyptian adventure well-prepared. With the right visa in hand, you can explore the timeless wonders of Egypt with confidence and ease. Safe travels!
Enjoyed this article?
Share it with your fellow travelers and inspire their next adventure.
Great instructions! The passport photo I took looks all “scunched up” when I view it on the visa website. Should the picture be only the page with the details on it or should it include the page before it when the passport is open? Hope that makes sense. I am US passport holder.
Thanks so much for your comment! The “scunched up” look is normal on the Egypt e-Visa site. All uploaded documents appear that way on their system. For the passport upload, we usually scan the photo/details page together with the next page as one image (an open, flat passport showing both pages). Hope this helps!
We are passionate about guiding you to unforgettable, authentic travel. With over two decades of collective firsthand global exploration, our seasoned experts share honest, unbiased advice and those ‘little secrets’ that craft truly immersive journeys. All our travel is independently funded – just real experiences, honestly shared.
TrippVibes is your guide to authentic travel, built on real-world experience. With over 5,000,000 miles flown and more than 45 countries explored, our honest, firsthand advice gives you the confidence to explore the world.
To provide the best experiences, we use technologies like cookies to store and/or access device information. Consenting to these technologies will allow us to process data such as browsing behaviour or unique IDs on this site. Not consenting or withdrawing consent, may adversely affect certain features and functions.
Functional
Always active
The technical storage or access is strictly necessary for the legitimate purpose of enabling the use of a specific service explicitly requested by the subscriber or user, or for the sole purpose of carrying out the transmission of a communication over an electronic communications network.
Preferences
The technical storage or access is necessary for the legitimate purpose of storing preferences that are not requested by the subscriber or user.
Statistics
The technical storage or access that is used exclusively for statistical purposes.The technical storage or access that is used exclusively for anonymous statistical purposes. Without a subpoena, voluntary compliance on the part of your Internet Service Provider, or additional records from a third party, information stored or retrieved for this purpose alone cannot usually be used to identify you.
Marketing
The technical storage or access is required to create user profiles to send advertising, or to track the user on a website or across several websites for similar marketing purposes.


Leave a Reply